Introduction
In recent years, the concept of guilt-free desserts has revolutionized the way we view indulgence. With an ever-growing focus on health and wellness, more and more people are seeking ways to satisfy their sweet tooth without derailing their nutrition goals. This trend has given rise to a plethora of creative recipes that allow you to enjoy dessert without the accompanying guilt. One such delightful creation is Guilt-Free Pumpkin Cheesecake Protein Ice Cream—a deliciously creamy treat that embodies the flavors of fall while keeping your health in check.
As autumn approaches, pumpkin becomes a seasonal favorite, making its way into everything from lattes to pies. But pumpkin is not just a festive flavor; it’s a nutritional powerhouse. Low in calories and rich in vitamins, this vibrant squash is packed with health benefits. For instance, pumpkin is an excellent source of beta-carotene, which converts to vitamin A in the body, supporting vision and immune function. Additionally, it provides a healthy dose of fiber, which aids in digestion and helps keep you feeling full.
The Guilt-Free Pumpkin Cheesecake Protein Ice Cream recipe perfectly showcases the versatility of pumpkin. By utilizing wholesome ingredients, this recipe allows you to indulge in a creamy, decadent dessert that aligns with a healthy lifestyle. Whether you’re enjoying it as a post-workout recovery treat or a sweet finish to your dinner, this ice cream is sure to become a favorite.
Understanding the Ingredients
To create this delectable Guilt-Free Pumpkin Cheesecake Protein Ice Cream, it’s important to understand the role each ingredient plays in building both flavor and texture. Let’s take a closer look at the key components that make this recipe not only delicious but also nutritious.
The Benefits of Canned Pumpkin Puree
The star of our recipe is canned pumpkin puree. This ingredient is not only convenient but also incredibly nutritious. One cup of pumpkin puree contains about 80 calories, making it a low-calorie choice for adding bulk and flavor to desserts. It is also rich in dietary fiber, which promotes digestive health and helps maintain a feeling of fullness. Additionally, pumpkin is loaded with vitamins A and C, both of which are antioxidants that help combat free radicals in the body. The high beta-carotene content gives pumpkin its vibrant orange color and supports eye health as well.
The Role of Greek Yogurt
Next up is Greek yogurt, a staple in many healthy recipes. Greek yogurt is packed with protein, making it an excellent choice for those looking to increase their protein intake without adding excessive calories. A single serving can contain twice the protein of regular yogurt, promoting satiety and aiding in muscle recovery. Moreover, its creamy texture contributes to the smoothness of the ice cream, creating a rich mouthfeel that complements the pumpkin flavor beautifully. The probiotics found in Greek yogurt also support gut health, making it a functional ingredient in this dessert.
Low-Fat Cream Cheese: A Healthier Alternative
To achieve that classic cheesecake flavor, we incorporate low-fat cream cheese into our recipe. This ingredient adds a delightful richness to the ice cream without the excess calories typically associated with full-fat cream cheese. Low-fat cream cheese retains the creamy texture you expect from cheesecake, while allowing you to enjoy the flavor you love without the guilt. It’s a perfect balance that enhances the dessert’s indulgent qualities while keeping it on the healthier side.
Natural Sweeteners: Honey vs. Maple Syrup
Sweetness is essential in any dessert, and for this recipe, we have the option of using either honey or maple syrup as our natural sweetener. Both options come with their own unique flavor profiles and health benefits. Honey is known for its antimicrobial properties and is slightly sweeter than sugar, which means you may need less of it. On the other hand, maple syrup offers a distinct caramel-like flavor that pairs beautifully with pumpkin. It is also rich in antioxidants and contains essential minerals such as manganese and zinc. When choosing between the two, consider your personal taste preference and dietary needs, as both can enhance the overall flavor of the ice cream.
The Power of Protein Powder
To boost the protein content of our Guilt-Free Pumpkin Cheesecake Protein Ice Cream, we include protein powder. This addition not only enhances the nutritional profile but also contributes to the ice cream’s creamy texture. Protein powder is particularly beneficial for those who lead active lifestyles, as it aids in muscle recovery and promotes satiety. When selecting a protein powder, opt for a high-quality option that aligns with your dietary preferences, whether it be whey, casein, or plant-based.
Spices and Flavor Enhancers
Finally, we can’t forget the spices that elevate the flavor of our ice cream. Pumpkin pie spice is a quintessential blend that typically includes cinnamon, nutmeg, ginger, and allspice. This combination captures the essence of fall and enhances the pumpkin flavor, creating a comforting and aromatic profile. Additionally, a splash of vanilla extract adds depth and warmth to the ice cream, rounding out the flavors and making each bite a delightful experience.
Step-by-Step Instructions
Now that we’ve covered the ingredients and their contributions to this Guilt-Free Pumpkin Cheesecake Protein Ice Cream, let’s dive into the step-by-step preparation process. Creating this delicious treat is straightforward and allows you to enjoy the flavors of fall with ease.
Blending the Base for Creamy Perfection
To start, gather all your ingredients, ensuring that you have everything ready for a smooth cooking process. Begin by adding the canned pumpkin puree, Greek yogurt, low-fat cream cheese, and your chosen sweetener—honey or maple syrup—into a high-speed blender or food processor.
1. Combine Ingredients: Add 1 cup of canned pumpkin puree, 1 cup of Greek yogurt, 4 ounces of low-fat cream cheese (softened), and 1/4 cup of honey or maple syrup to your blender.
2. Incorporate Protein Powder: Next, add one scoop of your preferred protein powder. This is crucial for enhancing the texture and nutritional value of the ice cream.
3. Add Spices: Sprinkle in 1 teaspoon of pumpkin pie spice and 1 teaspoon of vanilla extract. These will infuse your mixture with warm, comforting flavors.
4. Blend Until Smooth: Secure the lid on your blender or food processor and blend the mixture on high speed until it reaches a creamy, smooth consistency. This should take about 1-2 minutes. If you encounter any issues with blending, such as thick clumps or difficulty mixing, pause the blender and scrape down the sides with a spatula. You can also add a splash of milk or almond milk to help thin it out if necessary.
5. Taste and Adjust: Before transferring your mixture to a container, taste it to ensure the sweetness and spice levels are to your liking. If you prefer a sweeter ice cream, feel free to add an additional tablespoon of honey or maple syrup.
Once you have achieved the desired flavor and texture, you’re ready to move on to the next steps in the ice cream-making process.
Stay tuned for the subsequent sections, where I will detail how to freeze your ice cream mixture to achieve that perfect scoopable consistency and share tips for serving and storing your Guilt-Free Pumpkin Cheesecake Protein Ice Cream.
{{image_1}}
Adjusting Sweetness for Personal Preference
One of the joys of making your own guilt-free pumpkin cheesecake protein ice cream is the ability to customize it to your taste. As you blend the ingredients, take a moment to taste the mixture before chilling it. This is your opportunity to adjust the sweetness level according to your preferences. If you find it a bit too tart, you can add a drizzle of maple syrup, honey, or your favorite sweetener. Blend the mixture again until smooth, and don’t hesitate to taste it once more. Remember, the sweetness will slightly mellow after freezing, so if you think it’s just right at this stage, you’re on the right track!
Chilling: The Key to Flavor Development
Once you are satisfied with the sweetness, the next critical step is chilling the mixture. Chilling is essential for flavor development; it allows the ingredients to meld and deepen the flavors, resulting in a more robust and delicious final product. Transfer your blended mixture to an airtight container and place it in the refrigerator for at least 2 hours, or even overnight if you have the time. This resting period is worth the wait, as it enhances the overall taste of your pumpkin cheesecake protein ice cream, making it creamy and rich once churned.
Churning Techniques: Ice Cream Maker vs. Freezer Method
Now that your mixture is chilled, it’s time to churn it into ice cream. There are two main methods you can use: an ice cream maker or the freezer method.
Ice Cream Maker: If you have an ice cream maker, this is the easiest way to achieve a smooth, creamy texture. Pour the chilled mixture into your machine and churn according to the manufacturer’s instructions. Typically, this will take about 20-30 minutes. The ice cream will be soft but ready to serve immediately or can be placed in the freezer for a firmer texture.
Freezer Method: If you don’t own an ice cream maker, don’t worry! You can still create delicious ice cream using the freezer method. Pour the chilled mixture into a shallow dish, like a metal baking pan, and place it in the freezer. After 30 minutes, take it out and stir it vigorously with a fork to break up any ice crystals that may have formed. Repeat this process every 30 minutes for about 2-3 hours, until the ice cream is fully frozen and has a creamy texture. This method requires a bit more attention, but the result is worth the effort.
Freezing for the Perfect Scoop
Regardless of the churning method you choose, patience is key when it comes to freezing. If using the freezer method, stirring the mixture every 30 minutes is crucial to prevent ice crystals from forming. Ice crystals can lead to a grainy texture, which is not what you want for your pumpkin cheesecake protein ice cream. By actively stirring, you help to create a smoother, creamier product. Once fully frozen, allow it to sit at room temperature for a few minutes to soften slightly before scooping. This will make serving easier and ensure you get that perfect scoop every time.
Serving Suggestions
Now that your guilt-free pumpkin cheesecake protein ice cream is ready, it’s time to serve it up in style! Here are some creative ideas to enhance both the visual appeal and flavor of your dessert:
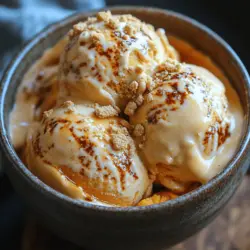
Garnishing with Crushed Graham Crackers: One of the simplest and most delightful ways to elevate your ice cream is by adding a sprinkle of crushed graham crackers on top. This adds a satisfying crunch and pays homage to traditional cheesecake. The sweet, crumbly texture contrasts beautifully with the creamy ice cream, making each bite a delightful experience.
Pairing Suggestions: Consider adding additional toppings to cater to different tastes. A dollop of whipped cream adds a light, fluffy element, while a drizzle of caramel sauce can provide a rich sweetness that complements the flavors of pumpkin and spice. For a nutty crunch, sprinkle some toasted pecans or walnuts over the top. Each of these toppings can enhance the experience and allow guests to personalize their servings.
Nutritional Information
For those mindful of their dietary intake, here’s a comprehensive breakdown of the nutritional facts per serving of guilt-free pumpkin cheesecake protein ice cream:
– Calories: Approximately 150
– Protein: 10g
– Carbohydrates: 22g
– Fats: 5g
– Fiber: 3g
– Sugars: 5g (depending on sweetener used)
This dessert provides a healthy balance of protein and carbohydrates, making it a satisfying choice for a post-workout snack or a guilt-free treat after dinner. The use of pumpkin adds fiber and essential nutrients, while the absence of heavy cream keeps it light yet creamy.
Seasonal Appeal and Versatility
This guilt-free pumpkin cheesecake protein ice cream is perfect for the fall season, where pumpkin flavors reign supreme. However, its versatility makes it suitable for year-round enjoyment. You can easily adapt this recipe to explore other flavors as well. For instance, consider substituting pumpkin with ripe bananas or ripe strawberries for a fruity twist. You could even experiment with spices, such as adding a hint of ginger or cardamom for a more exotic flavor profile. The base recipe remains the same, allowing for endless delicious variations.
Conclusion
Making guilt-free pumpkin cheesecake protein ice cream is not just about indulging in a delicious dessert; it’s about balancing indulgence with health. With the right ingredients and a little creativity, you can create a treat that everyone can enjoy, regardless of their dietary preferences. The joy of crafting homemade desserts lies in the ability to customize flavors and adjust sweetness, allowing for a personal touch that store-bought options simply cannot provide.
Whether you choose to savor it on a cool fall evening or whip it up in the summer heat, this recipe encourages experimentation and creativity. Dive into the world of guilt-free desserts, and don’t hesitate to make this pumpkin cheesecake protein ice cream your own. Enjoy the satisfaction of knowing you’ve created something delicious, nutritious, and uniquely suited to your tastes. Happy ice cream making!