
Introduction
Cinnamon sugar pretzel bites are the ultimate sweet snack that combines the irresistible taste of freshly baked pretzels with a delightful sprinkle of cinnamon sugar. These bite-sized treats are not only delicious but also bring a comforting aroma to your kitchen as they bake. Whether you’re looking for a fun dessert to serve at a gathering or a sweet indulgence for movie night, cinnamon sugar pretzel bites hit the mark perfectly.
What makes these pretzel bites so appealing is their unique balance of flavors and textures. The soft, chewy interior contrasts beautifully with the crunchy, cinnamon-sugar coating, creating a delightful experience in every bite. The warm sweetness of cinnamon pairs harmoniously with the salty undertones of the pretzel dough, making them a satisfying treat for both kids and adults alike.
The best part? You can easily make these pretzel bites right in your own kitchen! Crafting homemade pretzels is a fun project that allows you to enjoy the process of baking while creating a delicious snack. With just a few simple ingredients and some time, you can transform your kitchen into a bakery and enjoy the satisfaction of serving freshly made cinnamon sugar pretzel bites to friends and family.
Understanding Ingredients
Before diving into the step-by-step instructions, it’s essential to understand the key ingredients that contribute to the texture, flavor, and overall appeal of cinnamon sugar pretzel bites. Each component plays a vital role in ensuring that your pretzels turn out perfectly.
Warm Water and Yeast: The Foundation of Dough
At the heart of any good pretzel recipe is the dough, which begins with warm water and yeast. The yeast serves as the leavening agent, responsible for creating the light, airy texture of the pretzel bites. When activated, yeast ferments and produces carbon dioxide, causing the dough to rise.
To activate the yeast, it’s crucial to use warm water—ideally around 110°F (43°C). If the water is too hot, it can kill the yeast, while water that is too cold will not activate it effectively. After mixing the yeast with warm water and letting it sit for about 5 to 10 minutes, you should see a foamy layer on the surface. This foam indicates that the yeast is alive and ready to work its magic in the dough.
Flour: Creating Structure
All-purpose flour is the backbone of the dough, providing structure and stability to your pretzel bites. The gluten proteins in the flour develop when kneaded, giving the dough its elasticity and chewiness—key characteristics of traditional pretzels.
For the best results, it’s important to measure the flour accurately. Too much flour can lead to a dense texture, while too little can result in a sticky, unmanageable dough. A good starting point is to use a kitchen scale for precision, or you can spoon the flour into a measuring cup and level it off with a knife for a more accurate measurement.
Sugar: Sweetening the Deal
Sugar plays a dual role in this recipe. Firstly, it adds sweetness to the dough, enhancing the overall flavor of the pretzel bites. Secondly, it contributes to the caramelization process during baking, resulting in a beautifully golden exterior.
Using granulated sugar in the dough helps to balance the saltiness of the pretzels. Additionally, a generous coating of cinnamon sugar on the finished bites provides that signature sweet touch that makes these treats so irresistible.
Salt: Enhancing Flavors
Salt is an essential ingredient in any baked good, and cinnamon sugar pretzel bites are no exception. It enhances the flavors of the dough and provides a delightful contrast to the sweetness of the sugar.
When making the dough, salt not only helps to elevate the overall taste but also strengthens the gluten structure, improving the texture of the pretzels. Just a pinch of salt can make a significant difference, so be careful not to skip this step!
Baking Soda: The Secret to Chewy Pretzels
One of the unique aspects of making pretzels is the boiling process involving baking soda. Before baking, the pretzel bites are briefly boiled in a solution of water and baking soda, which is critical for achieving that signature chewy texture.
The alkaline nature of baking soda changes the pH of the dough, allowing for a better crust formation during baking. This process also contributes to the distinctive brown color of the pretzels and enhances their flavor profile. Boiling for just 30 seconds per batch is usually sufficient to achieve the desired texture without overcooking the dough.
Egg Wash and Butter: Achieving Golden Perfection
To give your pretzel bites that tantalizing golden-brown color, an egg wash is applied before baking. An egg wash consists of beaten eggs mixed with a bit of water or milk, brushed over the surface of the dough to promote browning and add a slight shine.
Once the pretzel bites come out of the oven, a generous coating of melted butter is applied, enhancing the flavor and helping the cinnamon sugar adhere to the surface. This crucial step not only adds richness but also creates a more indulgent and satisfying finish to your sweet snack.
Step-by-Step Instructions for Cinnamon Sugar Pretzel Bites
Now that you have a solid understanding of the ingredients and their purposes, it’s time to get started on the delicious process of making cinnamon sugar pretzel bites. Follow these detailed instructions for a successful outcome.
Activating the Yeast: Achieving the Perfect Foam
1. Gather Your Ingredients: Start by measuring out 1 cup of warm water (between 110°F and 115°F), 2¼ teaspoons of active dry yeast, and 1 tablespoon of granulated sugar.
2. Mix and Wait: In a small mixing bowl, combine the warm water, sugar, and yeast. Stir gently until the sugar is dissolved. Let the mixture sit undisturbed for about 5 to 10 minutes. You should see bubbles forming on the surface, indicating that the yeast is activated and ready to use.
3. Prepare the Dry Ingredients: In a separate large mixing bowl, combine 4 cups of all-purpose flour, 1 teaspoon of salt, and a pinch of cinnamon. Whisk these dry ingredients together to ensure they are evenly distributed.
Making the Dough: Kneading Techniques
1. Combine Ingredients: Once the yeast mixture is frothy, pour it into the bowl of dry ingredients. Use a wooden spoon or spatula to mix until a shaggy dough forms.
2. Kneading the Dough: Transfer the dough onto a clean, floured surface. Knead the dough for about 5 to 7 minutes, adding additional flour as needed to prevent sticking. The goal is to achieve a smooth and elastic dough. You’ll know it’s ready when it springs back slightly when pressed.
3. First Rise: Shape the kneaded dough into a ball and place it in a greased bowl, turning it to coat all sides. Cover the bowl with a clean kitchen towel or plastic wrap and let it rise in a warm, draft-free area for about 1 to 1.5 hours, or until it has doubled in size.
As your dough rises, you can prepare your baking setup and gather any additional tools you may need, such as a baking sheet lined with parchment paper, a large pot for boiling, and a slotted spoon.
Stay tuned for the next part of the article, where we will continue with the preparation of the cinnamon sugar coating, the boiling process, and the final baking steps to create the perfect cinnamon sugar pretzel bites.
{{image_1}}
How to Knead Dough Properly for Elasticity and Smoothness
Kneading dough is a crucial step in making cinnamon sugar pretzel bites, as it develops gluten, giving the dough its characteristic elasticity and smooth texture. To knead properly, start by flouring your work surface lightly. Place your dough on the floured surface and use the heel of your hand to push the dough away from you. Fold it back over itself, give it a quarter turn, and repeat the process. This method ensures that the dough is worked evenly. Continue kneading for about 8-10 minutes until the dough is smooth and elastic. If the dough is too sticky, add a little more flour as needed. Properly kneaded dough will spring back when poked, indicating it is ready for the first rise.
First Rise: Creating the Ideal Environment
After kneading, it’s time for the first rise, which is essential for allowing the dough to expand and develop flavor. To create the ideal environment for dough rising, find a warm, draft-free area. You can achieve this by turning on your oven to the lowest setting for a few minutes, then turning it off. Place your dough in a greased bowl and cover it with a damp cloth or plastic wrap to retain moisture. The dough should rise for about 1 to 1.5 hours or until it has doubled in size. This rise time allows the yeast to ferment, producing gases that make the dough light and airy.
Explanation of Rising Time and Conditions for Optimal Dough Expansion
Rising time can vary based on ambient temperature and humidity. Warmer conditions encourage faster rising, while cooler environments slow the process. If your kitchen is on the cool side, consider placing the dough in a slightly warmed oven or near a radiator. Avoid letting the dough rise too long, as over-proofing can lead to a dense texture. The dough is ready when it has roughly doubled in size and has a soft, airy feel. You can gently poke the dough; if the indentation remains, it’s perfect for shaping.
Shaping Pretzel Bites: Technique and Tips
Once the dough has risen, it’s time to shape your pretzel bites. Start by punching down the dough gently to release excess gas. On a floured surface, divide the dough into smaller portions, usually about 1-2 ounces each. Roll each piece into a long rope, approximately 10-12 inches long, and then cut the rope into bite-sized pieces, around 1-2 inches long. Keep the pieces uniform for even cooking.
For a visual guide, you can watch tutorials online that showcase the rolling and cutting technique. Remember, even if your shapes aren’t perfect, they will still taste delicious. Also, keep the dough pieces covered with a damp cloth as you shape them to prevent drying out.
The Boiling Process: Why It Matters
The boiling process is a defining step that sets pretzels apart from regular bread. Boiling the pretzel bites in a baking soda solution creates a unique crust that is both chewy and flavorful. The alkaline nature of baking soda enhances the browning process during baking, resulting in that signature pretzel color and texture.
Step-by-Step on Boiling Pretzel Bites and the Purpose of Baking Soda
To prepare for boiling, fill a large pot with water and add 1/2 cup of baking soda. Bring the water to a gentle boil. Carefully drop the pretzel bites into the boiling water, cooking them for about 30 seconds per batch. Avoid overcrowding the pot to ensure even cooking. Use a slotted spoon to remove the bites, allowing excess water to drain off before placing them on a parchment-lined baking sheet. This boiling step is essential for achieving that iconic pretzel flavor and texture.
Baking to Golden Perfection
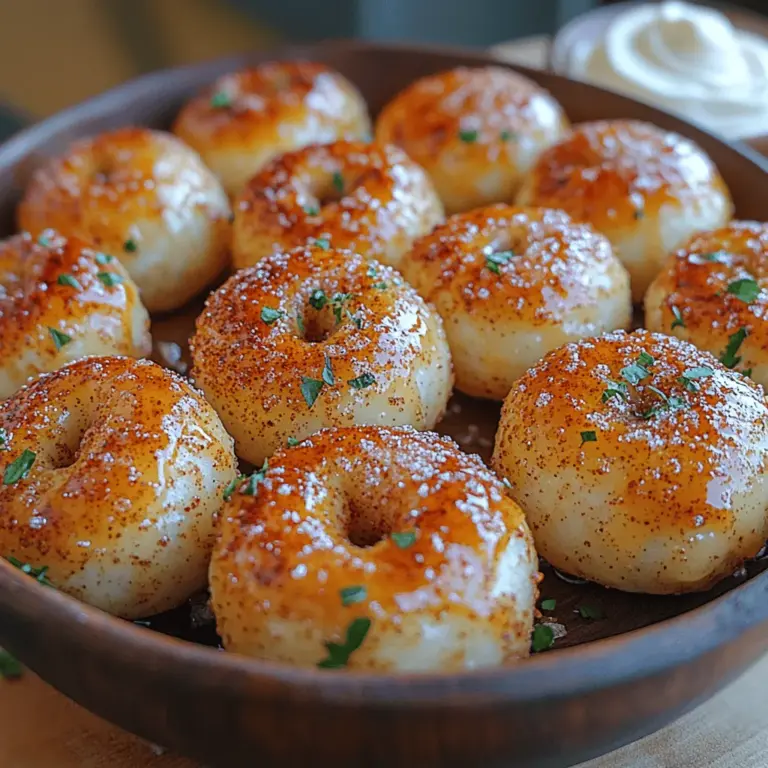
After the pretzel bites have been boiled and placed on the baking sheet, it’s time to bake them to golden perfection. Preheat your oven to 425°F (220°C). For an extra touch of flavor, sprinkle coarse sea salt on top of the pretzel bites before baking. Bake them for 12-15 minutes or until they are golden brown. Keep an eye on them during the last few minutes to ensure they don’t over-bake. The high temperature and short baking time help achieve a crispy exterior while keeping the inside soft and chewy.
Cinnamon Sugar Coating: Mixing for Maximum Flavor
While the pretzel bites are baking, prepare the cinnamon sugar coating. In a medium bowl, mix together 1/2 cup of granulated sugar and 1 tablespoon of ground cinnamon. Adjust the ratios based on your preference for sweetness and cinnamon flavor. This mixture will give the pretzel bites their delightful sweetness and aromatic spice, making them irresistible.
Final Coating: Bringing It All Together
Once the pretzel bites are out of the oven and still warm, it’s time to coat them with the cinnamon sugar. Place the warm pretzel bites in a large bowl, then sprinkle the cinnamon sugar mixture over the top. Toss gently to ensure that each bite is evenly coated. For maximum flavor, you can also melt 1/4 cup of butter and brush it on the pretzel bites before adding the cinnamon sugar. This step adds richness and helps the sugar adhere perfectly.
Ideal Pairings for Cinnamon Sugar Pretzel Bites
Cinnamon sugar pretzel bites are delicious on their own, but they can be elevated further with some ideal pairings. Here are a few suggestions to enhance your snacking experience:
– Dips: Serve these delicious bites with a variety of dips. Cream cheese frosting is a classic choice that adds a sweet and creamy element. For a decadent treat, offer chocolate sauce or caramel dip. The contrast of flavors and textures will make your snack time even more enjoyable.
– Presentation Ideas for Parties and Gatherings: When hosting a gathering, consider presenting your cinnamon sugar pretzel bites in a creative way. Use a tiered serving stand to display them attractively. You can also arrange them in a festive basket lined with parchment paper for a rustic touch. Adding decorative toothpicks can make for a fun finger food option.
Storing Leftovers: Best Practices
If you have any pretzel bites left over (which is unlikely!), it’s essential to store them properly to maintain freshness. Allow the pretzel bites to cool completely before storing them in an airtight container. They can be kept at room temperature for up to 2 days. If you want to extend their shelf life, consider placing them in the refrigerator, where they can last for up to a week.
For reheating, preheat your oven to 350°F (175°C) and place the pretzel bites on a baking sheet. Heat for about 5-7 minutes or until warmed through. This method will help restore their chewy texture and warm, buttery flavor.
Conclusion
Making cinnamon sugar pretzel bites at home is a delightful culinary adventure that brings the warmth of freshly baked treats into your kitchen. The joy of kneading, shaping, and baking these bites culminates in a treat that’s perfect for any occasion. Whether you’re enjoying them at a family gathering or sharing them with friends, these pretzel bites are sure to impress.
Don’t hesitate to explore variations of this recipe, such as adding chocolate chips or experimenting with different flavor coatings. The possibilities are endless, and each twist adds a personal touch to this cherished treat. So gather your ingredients, roll up your sleeves, and start creating; the delicious experience of sharing these homemade cinnamon sugar pretzel bites with your loved ones is worth every moment spent in the kitchen.
