
Introduction
If you’re on the hunt for a quick and satisfying meal that pleases both kids and adults alike, look no further than cheesy chicken wraps. This delightful recipe is not only simple to prepare, but it also brings an explosion of creamy, cheesy goodness wrapped in a soft tortilla. Utilizing the convenience of rotisserie chicken, these wraps can be thrown together in no time, making them a perfect choice for busy weeknights or casual gatherings.
Cheesy chicken wraps are incredibly versatile. You can enjoy them for lunch, dinner, or even as a party appetizer. With just a few common ingredients, this recipe allows you to create a dish that feels both indulgent and comforting. The creamy texture combined with the savory flavors is sure to satisfy your cravings while also being a hit among family and friends. Let’s dive into what makes cheesy chicken wraps so appealing and how you can easily whip them up in your own kitchen.
Understanding the Appeal of Cheesy Chicken Wraps
What makes cheesy chicken wraps so irresistible? The answer lies in the harmonious blend of flavors and textures that come together in each bite. The shredded chicken provides a hearty base, while the combination of cheese and creamy elements creates a luscious filling that is both rich and satisfying. The tortillas serve as the perfect vessel, holding everything together while adding a soft, chewy contrast to the creamy interior.
One of the greatest advantages of this recipe is its versatility. Cheesy chicken wraps can easily be adapted to fit various dietary preferences. Whether you’re looking for a gluten-free alternative, a low-carb option, or even a vegetarian version, this recipe is incredibly flexible. Swap out the rotisserie chicken for grilled vegetables or beans, use gluten-free tortillas, or experiment with different types of cheese to suit your taste. The possibilities are endless, making it a fantastic go-to meal for different occasions and dietary needs.
In today’s fast-paced world, convenience in cooking is paramount. This is where rotisserie chicken shines. Pre-cooked and available at most grocery stores, rotisserie chicken saves you the time and effort of cooking raw chicken, allowing you to focus on assembling your wraps. Tossing in pre-shredded cheese and fresh vegetables only adds to the efficiency of this recipe, making it an ideal option for anyone looking to prepare a delicious meal without spending hours in the kitchen.
Ingredients Breakdown
To create the perfect cheesy chicken wraps, you’ll need a handful of key ingredients that work together to deliver maximum flavor and satisfaction. Here’s a closer look at each component and why they’re essential to the recipe:
– Shredded Chicken: The star of the show! Using rotisserie chicken not only cuts down on preparation time but also infuses your wraps with a rich, savory flavor. The chicken is already seasoned, which means you don’t have to worry about marinating or cooking it yourself.
– Cheddar Cheese and Cream Cheese: These two types of cheese contribute to the creamy, indulgent texture of the filling. Cheddar cheese adds a sharp, tangy flavor, while cream cheese brings a smooth, velvety consistency that binds everything together. This combination creates a rich filling that simply melts in your mouth.
– Sour Cream and Green Onions: Adding a dollop of sour cream introduces a tangy note that balances out the richness of the cheeses. Meanwhile, green onions provide a burst of freshness and a mild onion flavor that enhances the overall taste of the wraps. Together, they elevate the filling, making every bite more complex and enjoyable.
– Bell Peppers: Offering both color and nutrition, bell peppers are a fantastic addition to cheesy chicken wraps. They provide a slight crunch and sweetness, complementing the other flavors beautifully. Additionally, bell peppers are packed with vitamins and antioxidants, making your meal not only delicious but also nutritious.
– Seasonings: The right seasonings can make or break a dish. In this recipe, garlic powder, onion powder, and paprika serve to amplify the flavors of the chicken and cheese. Garlic powder adds depth and savoriness, onion powder enhances the overall flavor profile, while paprika introduces a subtle smokiness that rounds out the dish.
With these ingredients, you can create cheesy chicken wraps that are not only delightful but also tailored to your personal preferences. Now that we’ve covered the ingredients, let’s explore the step-by-step instructions to ensure your wraps turn out perfectly every time.
Step-by-Step Instructions for Perfect Cheesy Chicken Wraps
Mixing the Filling
To begin the process of making cheesy chicken wraps, you’ll want to start by preparing the filling. This step is crucial as it sets the foundation for the entire wrap. Here’s how to do it:
1. Gather Your Ingredients: Make sure you have all your ingredients prepped and ready to go. Shred your rotisserie chicken, chop the green onions and bell peppers, and measure out your cheeses and seasonings. Having everything on hand will streamline the cooking process.
2. Combine the Chicken and Cheeses: In a large mixing bowl, add the shredded rotisserie chicken, cream cheese, and shredded cheddar cheese. The cream cheese should be at room temperature to ensure easy mixing. Use a spatula or wooden spoon to gently fold the ingredients together. Make sure that the chicken is evenly coated with the cheese mixture, which will create that luscious, creamy filling.
3. Add the Vegetables: Once the chicken and cheeses are well combined, it’s time to introduce the chopped green onions and bell peppers. These ingredients not only add flavor but also contribute to the texture and visual appeal of your wraps. Gently fold them into the mixture until they’re evenly distributed.
4. Season to Taste: Sprinkle in the garlic powder, onion powder, and paprika. These seasonings are essential for enhancing the overall flavor of the filling. Mix thoroughly, ensuring that the spices are well incorporated throughout the chicken and cheese mixture. Taste the filling and adjust the seasoning if necessary, adding more salt or pepper as needed.
5. Check Consistency: The filling should be creamy and cohesive, holding together without being too runny. If it feels a bit dry, you can add a splash of sour cream for additional moisture. Conversely, if it’s too wet, consider adding a bit more cheese to achieve the desired consistency.
6. Assemble the Wraps: Now that your filling is ready, it’s time to start assembling the wraps. Lay a tortilla flat on a clean surface or a cutting board. Spoon a generous portion of the cheesy chicken filling onto the center of the tortilla, leaving enough space around the edges to fold and roll it up properly.
By following these initial steps carefully, you’ll set yourself up for a successful outcome and ensure that your cheesy chicken wraps are bursting with flavor. Continue to roll up the wraps and explore how to cook them for optimal results in the upcoming sections.
{{image_1}}
Assembling the Wraps
Assembling your cheesy chicken wraps is an exciting step that allows you to customize each wrap to suit your taste. Start by laying out your tortillas on a clean surface or cutting board. Depending on the size of your tortillas, you can typically fit a generous amount of filling without compromising the wrap’s integrity.
Filling the Tortillas
Begin by adding a layer of cooked, shredded chicken to the center of each tortilla. Aim for about 1/3 cup of chicken per wrap, though this can vary based on your preference. Follow this with a sprinkle of cheese, ensuring it evenly covers the chicken. You can use a combination of cheeses for added flavor—mozzarella, cheddar, or pepper jack all work wonderfully. If desired, add other ingredients such as sautéed bell peppers, onions, or beans to enhance the flavor and texture.
Tips for Folding and Rolling Tortillas to Prevent Spillage
To fold your wraps efficiently, follow these simple steps:
1. Start with the Sides: Fold the right and left sides of the tortilla inwards toward the center. Ensure they are snug against the filling.
2. Roll from the Bottom: Starting from the bottom (the side closest to you), begin to roll the tortilla away from you while keeping the sides tucked in. This method helps prevent any spillage during the cooking process.
3. Secure the Wrap: Once fully rolled, you can secure your wraps with a toothpick if necessary, or simply place them seam-side down on a plate to hold them together.
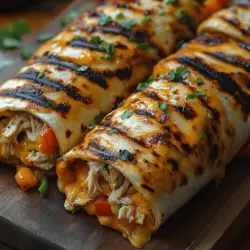
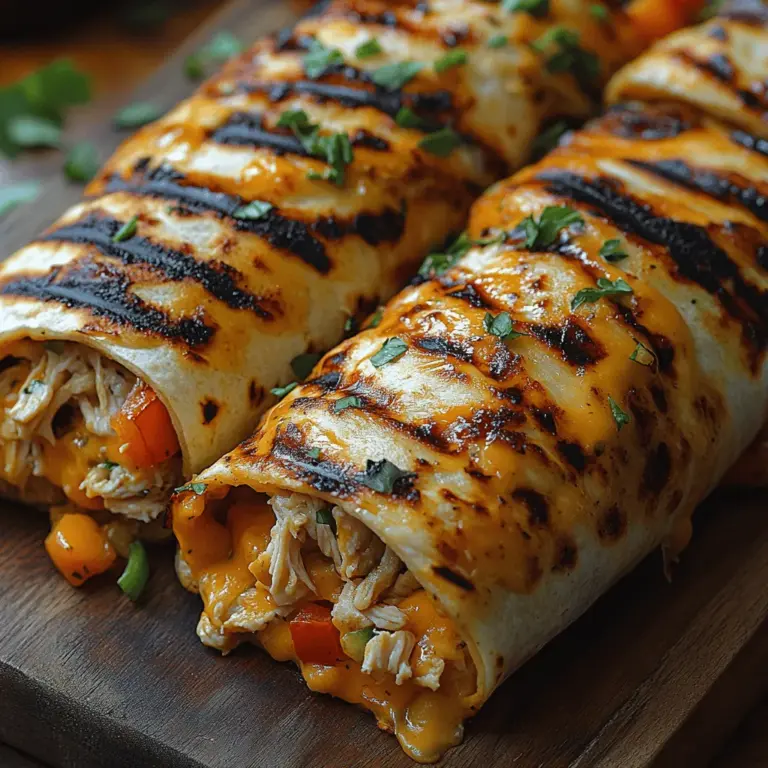
Grilling the Wraps
Grilling your cheesy chicken wraps is the key to achieving that perfect crispy texture that everyone craves. Here’s how to do it:
Grilling Process
1. Preheat your grill or grill pan over medium heat. If you’re using an outdoor grill, ensure that the grates are clean and lightly oiled to prevent sticking.
2. Place your assembled wraps on the grill, seam-side down. Grill for about 3-4 minutes, or until golden brown and crispy.
3. Carefully flip the wraps using tongs and grill for an additional 3-4 minutes on the other side. The cheese should be melted, and the tortillas should develop a beautiful char.
Alternative Cooking Methods
If grilling isn’t an option, you can also prepare these wraps in the oven or air fryer:
– Oven Method: Preheat your oven to 400°F (200°C). Place the wraps on a baking sheet lined with parchment paper and bake for about 15 minutes, flipping halfway through, until golden and crispy.
– Air Fryer Method: Preheat your air fryer to 375°F (190°C). Cook the wraps for about 10 minutes, flipping halfway through for even cooking. The result will be a delightfully crispy wrap with a slightly healthier profile.
Serving Suggestions
Serve your cheesy chicken wraps immediately after cooking for the best flavor and texture. Here are some delightful ideas for dipping sauces and side dishes to complement your wraps:
Dipping Sauces
– Creamy Ranch Dressing: A classic choice, ranch dressing pairs perfectly with the cheesy goodness of the wraps.
– Guacamole: The creaminess of guacamole adds a delightful freshness and richness that balances the savory chicken and cheese.
– Salsa: A vibrant salsa can enhance the flavor profile, adding a spicy kick. Opt for pico de gallo or a fruit salsa for a twist.
Sides
– Fresh Salad: A light, crisp salad with a citrus vinaigrette can provide a refreshing counterpoint to the richness of the wraps.
– Sweet Potato Fries: Baked or air-fried sweet potato fries are a nutritious and delicious side that pairs well with the wraps.
– Coleslaw: A tangy coleslaw can add crunch and zest, making it a perfect accompaniment.
Presentation Tips
To make your dish visually appealing, consider serving the wraps cut in half to reveal the colorful filling. Arrange them on a platter with small bowls of dips nearby. Garnish with chopped fresh herbs, like cilantro or parsley, for an added touch of color.
Nutritional Insights
Understanding the nutritional benefits of your cheesy chicken wraps can help you make informed choices while enjoying this delicious meal.
Caloric Breakdown
A typical cheesy chicken wrap contains approximately 350-500 calories, depending on the specific ingredients used, portion sizes, and whether you opt for additional toppings.
Nutritional Benefits
– Protein from Chicken: Chicken is an excellent source of lean protein, essential for muscle repair and overall health.
– Calcium from Cheese: Cheese provides calcium, which is vital for bone health.
– Fiber from Tortillas and Vegetables: Whole grain tortillas can add fiber to your meal, promoting digestion and satiety.
Healthier Substitutions
For those looking to make healthier choices, consider these substitutions:
– Whole Wheat Tortillas: Opt for whole wheat or low-carb tortillas for added fiber and nutrients.
– Low-Fat Cheese: Choose low-fat cheese options to reduce calorie intake while still enjoying the cheesy goodness.
– Lean Proteins: Substitute chicken with turkey or plant-based proteins like tofu or tempeh for a lighter option.
Exploring Variations and Customizations
The beauty of cheesy chicken wraps lies in their versatility. Here are some suggestions for customizing your wraps based on personal preferences:
Adding Vegetables
Incorporate a variety of vegetables into your wraps for added flavor and nutrition:
– Spinach: Fresh spinach adds a burst of color and nutrients.
– Corn: Sweet corn can provide a delightful crunch and sweetness.
– Avocados: Creamy avocados enhance the richness and add heart-healthy fats.
Spicing It Up
If you enjoy a little heat, consider these options:
– Jalapeños: Fresh or pickled jalapeños can add a spicy kick.
– Hot Sauce: Drizzle your favorite hot sauce inside the wrap before rolling for an extra layer of flavor.
Alternative Proteins
For those looking to switch things up, various proteins can be used:
– Turkey: Ground turkey or shredded turkey makes for a delicious alternative.
– Beef: Use seasoned ground beef for a heartier wrap.
– Plant-Based Substitutes: Consider using lentils, chickpeas, or meat substitutes for a vegetarian option.
Conclusion
Making cheesy chicken wraps at home is not only enjoyable but also incredibly rewarding. This recipe offers a delightful balance of flavors and textures, making it perfect for family dinners or gatherings with friends. The ease of preparation and the versatility of ingredients allow you to tailor each wrap to your liking, ensuring that everyone can enjoy a delicious meal.
Whether you choose to keep it classic or explore various customizations, cheesy chicken wraps are sure to become a favorite in your household. So roll up your sleeves, get creative in the kitchen, and enjoy a wholesome, satisfying dish that brings everyone together. Happy cooking!