In a world filled with indulgent desserts, finding a nutritious yet satisfying treat can be a challenge. Enter the Choco-Banana Bliss Bars, a delightful recipe that combines the natural sweetness of bananas with the rich flavor of cocoa. These bars are not only easy to make but are also packed with wholesome ingredients, making them the perfect snack for any time of day. Whether you’re looking for a post-workout boost, a midday pick-me-up, or a healthy dessert option, Choco-Banana Bliss Bars offer a delicious solution that satisfies your cravings without compromising your health.
The allure of these bars lies not only in their taste but also in their versatility. You can easily customize them to fit your dietary preferences or ingredient availability. Moreover, they are a fantastic way to use up overripe bananas, turning what might otherwise go to waste into a scrumptious treat. In this comprehensive guide, we will delve into the ingredients, preparation process, and nutritional benefits of these bars, ensuring you understand every aspect of creating this delicious treat.
Understanding the Ingredients: What Makes Choco-Banana Bliss Bars Special
To create the perfect Choco-Banana Bliss Bars, understanding the role of each ingredient is crucial. Each component plays a significant part in enhancing flavor, texture, and nutrition. Let’s explore what makes these ingredients special.
Exploring the Base Ingredients
The Role of Ripe Bananas in Baking
Ripe bananas are the star of this recipe. When bananas reach that perfect stage of ripeness, they become incredibly sweet and flavorful, making them an ideal natural sweetener for baked goods. They also add moisture, which helps bind the ingredients together, resulting in a soft and chewy texture. The natural sugars in bananas allow you to reduce the amount of added sweeteners, making these bars a healthier option compared to traditional dessert bars.
When selecting bananas for your bliss bars, look for those with brown spots. These bananas are sweeter and will lend a deeper flavor to your bars. If you have bananas that are too ripe, don’t worry; they can still be used in this recipe—just mash them well!
Almond Butter vs. Peanut Butter: Choosing Your Base
The choice between almond butter and peanut butter can significantly affect the flavor and texture of your Choco-Banana Bliss Bars. Both options provide healthy fats and protein, but they have distinct tastes. Almond butter has a milder and slightly sweet flavor, while peanut butter offers a more robust and nutty taste.
If you are allergic to peanuts or prefer a nut-free option, almond butter is a fantastic alternative. When selecting your nut butter, opt for natural varieties without added sugars or hydrogenated oils to keep your bars as wholesome as possible. The creamy texture of either almond or peanut butter will help bind the ingredients, creating a deliciously satisfying bar.
Sweeteners: Honey or Maple Syrup – Which One to Choose?
When it comes to sweetening your Choco-Banana Bliss Bars, both honey and maple syrup are excellent choices. Honey adds a unique floral sweetness and pairs wonderfully with bananas, while maple syrup provides a rich, earthy flavor that complements the cocoa.
If you’re vegan or prefer a plant-based option, maple syrup is the way to go. Both sweeteners serve to enhance the sweetness of the ripe bananas without overpowering them. You can adjust the amount based on your personal taste preferences; just remember that a little goes a long way!
The Importance of Dry Ingredients
The dry ingredients in your Choco-Banana Bliss Bars are just as important as the wet ingredients. They provide structure and texture, ensuring your bars hold together and have the perfect consistency.
The Nutritional Benefits of Rolled Oats
Rolled oats are a key ingredient in this recipe, providing a hearty base for your bars. They are rich in fiber, which aids digestion and helps you feel fuller for longer. Oats also contain essential vitamins and minerals, making them a nutritious addition to your diet.
Using rolled oats instead of quick oats ensures a chewy texture that adds to the overall experience of the bars. If you want to enhance the nutritional profile even further, consider using whole grain oats, which retain more nutrients than processed varieties.
Cocoa Powder: The Healthier Chocolate Option
Cocoa powder is the secret ingredient that gives Choco-Banana Bliss Bars their rich chocolate flavor. It is full of antioxidants and has been linked to numerous health benefits, including improved heart health and mood enhancement. When selecting cocoa powder, aim for unsweetened varieties to keep your bars healthy and allow the natural sweetness of the bananas to shine through.
Why Salt and Baking Powder Matter in Baking
Though they may seem insignificant, salt and baking powder play crucial roles in baking. A pinch of salt enhances the overall flavor of your bars, balancing the sweetness and bringing out the richness of the cocoa. Baking powder acts as a leavening agent, helping your bars rise and achieve a light, airy texture.
Without these two ingredients, your bars may turn out dense and lacking flavor. So don’t skip them; they are essential for achieving the perfect Choco-Banana Bliss Bars!
Enhancing Your Bars: Optional Add-Ins
While the base recipe for Choco-Banana Bliss Bars is delicious on its own, there are plenty of optional add-ins that can elevate your bars to a new level of flavor and texture.
The Crunch Factor: Nuts and Their Benefits
Nuts are a fantastic way to introduce a satisfying crunch to your bars while adding healthy fats and protein. Walnuts, pecans, or almonds can complement the banana and cocoa flavors beautifully. They also contribute essential nutrients, such as omega-3 fatty acids and vitamin E.
Chop the nuts coarsely and fold them into the batter just before pouring it into the baking pan. This will ensure they are evenly distributed throughout the bars, providing that delightful crunch in every bite.
Adding Texture: The Role of Shredded Coconut
For a tropical twist, consider adding unsweetened shredded coconut to your Choco-Banana Bliss Bars. Coconut not only offers a unique texture but also adds a subtle sweetness and flavor that pairs well with chocolate and banana.
Coconut is rich in fiber and healthy fats, making it a nutritious addition to your bars. You can use it in combination with nuts for a more complex texture or on its own as a delightful topping.
Customizing Flavor: Other Possible Add-ins
The beauty of Choco-Banana Bliss Bars is their versatility. Feel free to experiment with other add-ins to suit your taste. For instance, you could incorporate dark chocolate chips for an extra chocolatey experience or dried fruits like cranberries or raisins for a chewy contrast.
Spices such as cinnamon or vanilla extract can also enhance the flavor profile, giving your bars a warm and inviting aroma. Just remember that the key is to keep a balance; too many add-ins can alter the texture and moisture level of your bars.
Step-by-Step Guide to Making Choco-Banana Bliss Bars
Now that we’ve explored the ingredients that make Choco-Banana Bliss Bars so special, it’s time to dive into the preparation process. Making these bars is straightforward and requires minimal effort, making them a perfect project for bakers of all skill levels.
Preparing Your Baking Environment
Before you start mixing your ingredients, it’s essential to prepare your baking environment. This ensures a smooth and efficient baking experience.
Essential Kitchen Tools for Baking Success
To make your Choco-Banana Bliss Bars, you’ll need a few essential kitchen tools:
– Mixing bowls: Use one large bowl for the wet ingredients and another for the dry ingredients.
– A baking pan: A 9×9-inch square baking pan is perfect for this recipe.
– Parchment paper: This will help prevent the bars from sticking to the pan.
– A spatula or wooden spoon: For mixing the batter.
– Measuring cups and spoons: To ensure accurate ingredient measurements.
Having all your tools at hand will make the process more enjoyable, and you’ll be less likely to forget any ingredients.
How to Properly Line Your Baking Pan
Lining your baking pan with parchment paper is a simple yet effective way to ensure easy removal of the bars once they are baked. To do this, cut a piece of parchment paper large enough to cover the bottom and sides of the pan. You can lightly grease the pan with cooking spray or a bit of oil before placing the parchment paper to help it stick.
Once lined, allow the edges of the parchment paper to hang over the sides of the pan. This will create handles that make it easier to lift the bars out once they’ve cooled. Proper lining is crucial for maintaining the integrity of your bars and preventing them from crumbling when removed.
Mixing the Ingredients: Wet and Dry
With your baking environment prepared, it’s time to mix the ingredients. Proper mixing techniques are key to achieving the perfect batter texture for your Choco-Banana Bliss Bars.
Importance of Proper Mixing Techniques
Start by mashing your ripe bananas in a large mixing bowl until smooth. You can use a fork or a potato masher for this step. Next, add in your nut butter and sweetener of choice, mixing them together until fully combined. This ensures that the flavors meld together before introducing the dry ingredients.
In a separate bowl, combine your dry ingredients: rolled oats, cocoa powder, baking powder, and salt. Whisk them together to evenly distribute the baking powder and salt throughout the mixture.
Once your dry ingredients are well mixed, gradually fold them into the wet ingredients using a spatula. Be careful not to overmix; you want to combine everything until just incorporated. The goal is to achieve a thick batter, but it should not be dry. If the mixture seems too thick, you can add a splash of almond milk or water to achieve the desired consistency.
Tips for Achieving the Perfect Batter Texture
The perfect batter for Choco-Banana Bliss Bars should be thick yet pourable. If you find it too dry or crumbly, it may be due to the type of oats used or the size of your bananas. Adjust as needed by adding a small amount of liquid until you reach the right consistency.
Once your batter is well mixed, you’re ready to pour it into your prepared baking pan. Spread it evenly with your spatula, ensuring the surface is smooth. This step helps the bars bake evenly, resulting in a delightful texture that everyone will love.
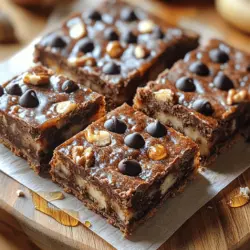
Stay tuned for the second part of this article, where we will continue with the baking process and provide you with some helpful tips for achieving the best results with your Choco-Banana Bliss Bars!
{{image_1}}
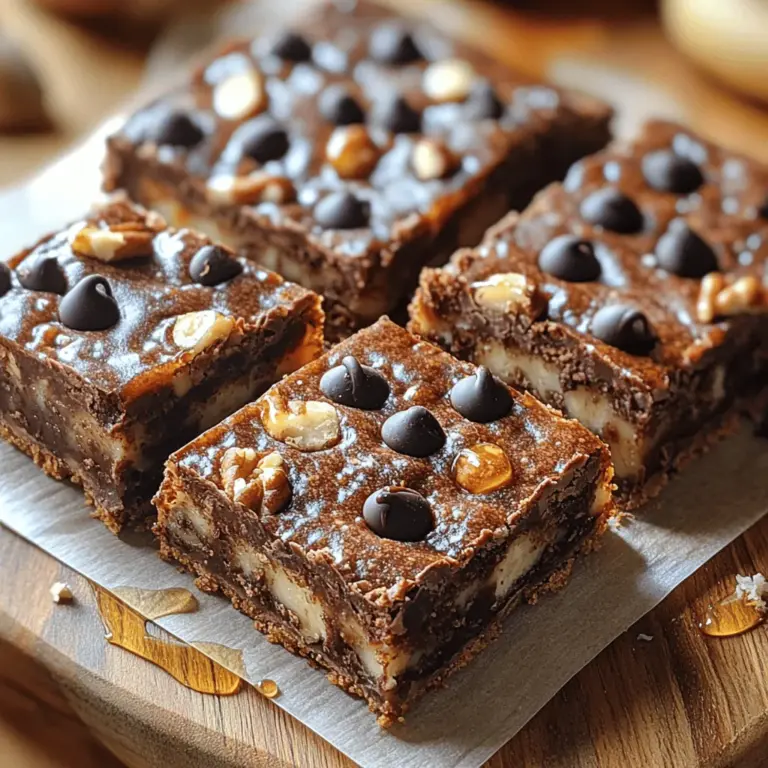
Baking to Perfection
Understanding Baking Times and Temperature
When it comes to baking Choco-Banana Bliss Bars, the right temperature and baking time are crucial for achieving that perfect texture. Preheat your oven to 350°F (175°C) to ensure even baking throughout the bars. This moderate temperature allows the ingredients to meld beautifully without burning the top or bottom.
Typically, baking these bliss bars will take around 25 to 30 minutes. Keep an eye on them as they approach the 25-minute mark; every oven varies slightly in temperature accuracy. The goal is to achieve a golden-brown top that signals the bars are ready.
How to Check for Doneness: Toothpick Method Explained
One of the simplest yet most effective methods to check for doneness is the toothpick test. Insert a toothpick into the center of the bars. If it comes out clean or with just a few moist crumbs clinging to it, your Choco-Banana Bliss Bars are perfectly baked. If it emerges with wet batter, give them a few more minutes in the oven, then check again. This method not only ensures that your bars are safe to eat but also helps maintain the ideal texture—moist and chewy without being overly dense.
Cooling and Serving Your Bars
The Best Cooling Techniques for Optimal Texture
Once your bliss bars are out of the oven, patience is key. Allow them to cool in the pan for about 10 to 15 minutes. This initial cooling period helps set the bars, making them easier to cut. After this time, gently lift the bars from the pan using parchment paper (if you lined it) and transfer them to a wire rack to cool completely. This allows air to circulate around the bars, preventing sogginess and helping to maintain their delightful texture.
Creative Ways to Serve Choco-Banana Bliss Bars
Choco-Banana Bliss Bars are versatile and can be enjoyed in various ways. Here are some creative suggestions to elevate your serving experience:
1. Layered Parfait: Crumble the bliss bars and layer them with yogurt and fresh fruits for a nutritious breakfast or dessert.
2. Ice Cream Topping: Serve crumbled bars over a scoop of vanilla or chocolate ice cream for an indulgent treat.
3. Nut Butter Drizzle: Drizzle almond or peanut butter over the top for an extra dose of flavor and healthy fats.
4. Chocolate Ganache: Melt some chocolate and pour it over the cooled bars for a decadent finish.
5. Snack Packs: Cut them into smaller squares and pack them for on-the-go snacks, perfect for busy days.
Nutritional Benefits of Choco-Banana Bliss Bars
Analyzing the Health Aspects of Key Ingredients
Choco-Banana Bliss Bars are not only delicious but packed with nutrition that makes them a guilt-free indulgence. Let’s break down the health benefits of some of the key ingredients:
1. Bananas: A Natural Source of Energy
Bananas are rich in carbohydrates, providing a quick energy boost, making them ideal for athletes or anyone needing an energy lift. They are also packed with potassium, which is essential for muscle function and overall health.
2. The Good Fats in Almond and Peanut Butter
Nut butters like almond and peanut butter are excellent sources of healthy fats, protein, and fiber. These fats help to keep you satiated longer and provide essential nutrients that promote heart health and reduce inflammation.
3. Cocoa Powder: Antioxidants and Mood Boosting Benefits
Cocoa powder is loaded with antioxidants, which can help combat oxidative stress in the body. Additionally, it contains compounds that may enhance mood, making your bliss bars not just a treat but a mood lifter as well.
Portion Control: Enjoying Your Treats Responsibly
While Choco-Banana Bliss Bars are nutritious, portion control is key to integrating treats into a healthy lifestyle. Understanding serving sizes can help you enjoy your bars without overindulging. A typical serving size of these bliss bars is about one square (approximately 2 inches by 2 inches).
By being mindful of how many bars you consume, you can savor the deliciousness while maintaining your health goals. Pairing your bars with a source of protein, like Greek yogurt or a protein shake, can further balance your snack and keep you feeling full.
Creative Variations on Choco-Banana Bliss Bars
Exploring Flavor Combinations
Choco-Banana Bliss Bars serve as a fantastic base for experimentation. Here are some delightful variations to consider:
1. Adding Spices: Incorporating spices like cinnamon, nutmeg, or cardamom can add warmth and depth to the flavor profile. These spices not only enhance taste but also provide additional health benefits, including anti-inflammatory properties.
2. Introducing Fruits: Dried fruits like cranberries or raisins can be added for a chewy texture and burst of flavor. You can also fold in fresh blueberries or chopped apples for a refreshing twist.
Making It Gluten-Free or Vegan
If you or your loved ones have dietary restrictions, the Choco-Banana Bliss Bars can easily be adapted:
1. Substitutions for Gluten-Free Options: Use gluten-free oats and almond flour instead of regular flour to create a gluten-free version of the bars. These alternatives will still provide a satisfying texture and flavor.
2. Transforming the Recipe into a Vegan Delight: To make the recipe vegan, substitute honey with maple syrup or agave nectar. Ensure your chocolate chips are dairy-free, and use a plant-based milk alternative, such as almond or oat milk.
Conclusion: Savoring the Experience of Choco-Banana Bliss Bars
Choco-Banana Bliss Bars are more than just a snack; they are a celebration of flavor and nutrition, making them a perfect addition to your cooking repertoire. By understanding the ingredients, mastering the preparation process, and exploring creative variations, you can enjoy these bars while nourishing your body and satisfying your sweet cravings. Whether as a post-workout snack, a midday treat, or a delightful dessert, these bliss bars are sure to bring joy to your taste buds and health to your lifestyle.
As you experiment with different ingredients and flavors, remember that the essence of these bars lies in their simplicity and wholesome goodness. Enjoy the process of creating them, and don’t forget to share them with friends and family—after all, food is best enjoyed together.